|
|
|
Toyota
Altezza |
Toyota
Altezza links |
Pictures |
|
Welcome to the Altezza info
area. Technical Information the Altezza SXE10 3SGE isn't readily
available as the car is only for the Japanese domestic market.
I have been collecting all the information I can find and will be
posting it here for everyone's benefit. If you find any information
that is not here please
email it
to me |
|
|
|
GENERAL CAPACITIES
Engine oil
3S-GE oil change only=4.8 Liters/ recommended grade 5W30/SJ
3S-GE oil change with filter=5.1Liters/recommended grade 5W30/SJ
1G-FE oil change only=3.9 Liters recommended grade 10W30/SJ
1G-FE oil change with filter=4.1 Liters recommended grade 10W30/SH
Transmission oil
Toyota genuine MG gear oil special II (API GL-3 and SAE75W-90)
6 speeds MT 1.95 L 70W90/GL3
5 speeds AT 7.2 L Type T-IV
4th gear AT 6.3 L Type T-IV
Diff. oil
The Toyota genuine high boiled gear oil SX (API GL-5 and SAE85W-90)
LSD 1.00 L 85W90/GL5
NO LSD 1.05 L 85W90/GL5
Brake fluid --- Genuine 2500H
Clutch fluid --- Genuine 2500H
Power steering fluid 0.9 L
Coolant
3S-GE 6.8 L
1G-FE 6.6 L
|
Wheel alignment settings (SXE10
and GXE10)
Front side slip 0±5
Front camber -0°30'±45'
Front caster 6°05'±45'
Front king pin angle 9°25'±45'
Front toe in 1±2mm
Rear camber -0°55'±45'
Rear toe in 2±2mm
(IS200)
FRONT
Caster Min = 5 deg 16', Max = 6 deg 16'
Camber Min = -0 deg 51', Max = 0 deg 9'
Toe Min = -0 deg 6', Max = 0 deg 18'
SAI = 9 deg 16'
REAR
Camber Min = -0 deg 53', Max = 0 deg 7'
Toe Min = 0 deg, Max = 0 deg 24' |
|
Battery size
Standard=34B19L
Electro upgrade- HID Lights/heated seats=46B24L
Cold area specification and the TRC equipment/AS200=55D23L
|
|
Part # of general service
items
Front disk 43512-22220
Rear disk 42431-51010
F disk pad 04465-30080
R disk pad 04466-51010
Filter element 1G-FE (GXE10) 17801-70050
Oil filter 1G-FE (GXE10) 90915-20001
Filter element 3S-GE (SXE10)17801-46080
Oil filter 3S-GE (SXE10) 90915-10001
Clutch cover ASSY 31210-22150 SXE10 (M/T)
Clutch disk ASSY 31250-53011 SXE10 (M/T)
Clutch bearing 31230-53010 SXE10 (M/T)
Input shaft bearing 90363-12004 SXE10 (M/T)
|
|
Bulbs
Headlight Low 12V51W-HB4
Headlight Hi 12V60W-HB3
Fog lamp 12V51W-HB4
Small lamp 12V5W- wedge sphere
Wien car (front side) 12V21W- wedge sphere
Wien car (front fender) 12V5W- wedge sphere
Wien car (rear side) 12V21W- invar valve
Rear small & stop (inside) 12V21/5W- wedge sphere
Rear small & stop (outside) 12V21/5W- wedge sphere
Back lamp 12V21W- wedge sphere
Rear fog lamp 12V21W- wedge sphere
License number light 12V5W- wedge sphere
High mount stop lamp 12V18W- wedge sphere
Map lamp 12V10W/12V8W- wedge sphere
Room lamp 12V8W- wedge sphere
Grab box lamp 12V1.2W
Front ashtray 12V1.4W
Ignition key hole illumination 12V1.4W
|
|
Color CODES
2003
062-White Crystal
1C0-Millenium Silver
1C6-Graphite Gray Pearl
202-Black Onyx
3P0-Absolutely Red
576-Solar Yellow
585-Cibola Gold Metallic
6R4-Electric Green Mica
8N8-Intensa Blue Pearl
2002
062-Crystal White
1C0-Millenium Silver
1C6-Graphite Gray
202-Black Onyx
3P0-Absolutely Red
576-Solar Yellow
585-Cibola Gold
6R4-Electric Green
8N8-Intensa Blue
2001
202-Black Onyx
576-Super Bright Yellow
3N3-Red Mica
1C6-Dk..Gray Mica
051-Diamond White P
1C0-Millenium Silver
6Q7-Dk. Green
8M6-Spectra Blue
|
|
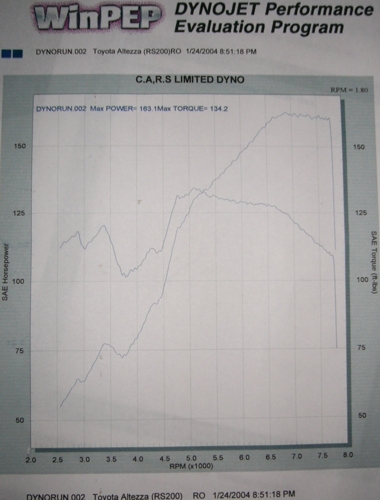
I found this dyno result for
the beams dual vvt-i with the Greddy e-manage added (only
modification, exhaust)
Decent overall torque increase
after dyno tuning to optimise the fuel & ignition requirements via
E-manage. Car is now much smoother and pleasant to drive and the cam
switchover is more pronounced as can be seen with the huge torque
increase around the 5000 rpm region. We estimate that overall
consumption will be down by 3-4%.
|
The gear ratio list of each
transmissions
6MT (Note)
6MT
5AT
4AT
1
3.106
3.874
3.357
2.450
2
2.175
2.175
2.180
1.450
3
1.585
1.484
1.424
1.000
4
1.223
1.223
1.000
0.730
5
1.000
1.000
0.753
-----
6
0.869
0.869
-----
-----
Retreat
3.672
3.672
3.431
2.222
Slowdown ratio
4.100
4.100
4.100
4.300
How to work out the VIN number
GF-SXE10-AEFVF (Z)
GF
Discharge gas regulation conformity display sign
GF: gasoline
SXE
Type-of-a-car display sign
SXE: ARUTETTSUA RS200
GXE: ARUTETTSUA AS200
10
Type-of-a-car display sign
10: ARUTETTSUA
A
Type-of-a-car display sign
A: ARUTETTSUA
E
Body form display sign
E: Sedan
F
Gearbox display sign
F: 6 ? M/T floorshift
A: 5 ? A/T floorshift
P: 4 ? A/T floorshift
V
Grade display sign
V: Standard
F
Motor use display sign
F: DOHC, EFI (S-GE engine)
K: DOHC (SHIZAZUGIA drive), EFI (1 G-FE engine)
(Z)
Package option sign
Blank: Standard
Z: Z edition
L: L edition
|
|
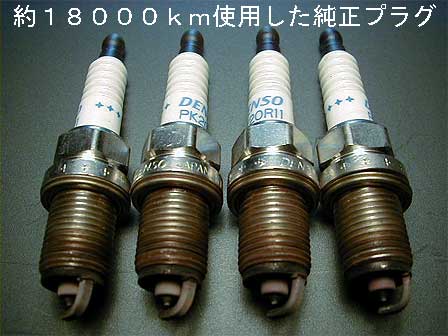
Plugs
Stock factory plug: NGK- BKR6EP (platinum)
Others used :NGK/IRIDIUM IX- BKR6EIX-11
DENSO/IRIDIUM TOUGH VK20
(Item number: V9110-5604)
DENSO/IRIDIUM POWER IK22
(Item turn: V9110-5310)
DENSO/IRIDIUM POWER IK20
(Item turn: 067700-8690)
TRD/ iridium sparkplug NGK7 turn suitable
(Item turn: 19059-SP004-22)
HKS/ super fire racing Item #: 5408-S35i)
(DENSO PK20R11)
after 18000km
 |
|
ECU PINOUT DIAGRAM
|
Replacing Rear Brake Pads
1.remove back wheel
2. Inspect Pad Thickness
Minimum Thickness : 1.0mm (0.039 in)
3.Remove Anti-Squeal Spring And Pad Guide
NOTICE
. Do Not deform the clip and anti-sqeal spring
.The anti-squeal clip and spring can be used again,
provided that they have sufficient rebound,
no-deformation, cracks or wear, and have had all rust,
dirt and particles cleaned off.
4.Remove Pads And Anti-Squeal Shims
5.Check Disc Thickness And Runout
6.Install New Pads
HINT
.Make sure the arrows on the inner anti-squeal shims
facing to the direction of disc rotation
.Preess in the pistons with a wrench handle or
equivelant(tape the end of the tool with tape)
.If the piston is difficult to push in, loosen the
bleeder screw
7.Install Pad GuidePin And Anti-Squeal Spring
8.Install Rear Wheel TORQUE TO: 103Nm (1,050Kgf.cm, 76
ft.lbf)
9.Depress Brake Pedal Several Times
10.Check That Fluid Level Is At Max Line |
|
Replacing Front Brakes
THE CORRECT MEANS OF SUPPORTING A CAR
SHOULD BE USED!
1. Support car -remember to turn wheel and remove the wheel.
2. On the inside of the caliper you will see 2 bolts about 14 mm.
unscrew the bottom one ONLY!! - you might need to hold the nut with
a spanner as well - now depending how worn your discs are, the
caliper might lift straight off or not.
3. Best to try and pull the caliper sideways a little ( outwards)
this is to try and push the pistons back in a tiny amount to make
removing the caliper a little easier failing that you can always
just pry up the caliper from its lower end.
4. From the lower end of the caliper, pull up slightly with a bit of
effort, then the caliper will rotate around the upper bolt( the pads
stay where they are)
4. Look at the pads - you will see 2 little springs that go into the
top of the pads pull these out and put them to one side.
5. Have a good look at the pads and note thier positions/
orientation so that there is no confusion on re-assembly - make a
drawing if you have to.
6. Remove the pads - just pull them out. one or two of the pads has
a metal plate behind it - note its orientation before removing it.
7. If you are replacing your pads, clean the area where the pad sits
in the caliper housing, re -fit the metal backing pad (note
orientation and little arrow)- put a TINY amount of copper
grease/paste between the pad and plate but dont get any on the pad
material. do the same for the other pad
7a. Cleaning pads - with a cloth or something clean the mating areas
of the pad/caliper and also the metal backing plate on one of the
pads ( note orientation, look at the little arrow) .Now if the pads
have become worn to the point where the chamfer on the ends of the
pads are worn away you should re chamfer these - just use a file or
if you have a bench grinder use that ( remember your dust mask)
somewhere about 45 degrees should be fine.
8. Re fit the little springs that you removed in step 4.
9. If you have replaced your pads then you will need to push the
caliper pistons back into the caliper - use a pair of water pump/
slip joint pliers to do this( if you have painted your calipers best
to wrap the jaws with a bit of masking tape or a bit of cloth)
If you have only cleaned your pads then you may not need to do this.
10. Lower the caliper down over the pads - if it wont go on
something is wrong! check!!!!!!!
11. Line up the hole in the caliper housing and the caliper itself,
put some thread lock on the bolt that you removed in step 2. re -
fit the bolt
TORQUE FIGURE IS 25LBS/FT.
12. Put the wheel back on and lower the car. TIGHTEN THE WHEEL NUTS
repeat on the other brake unit
14. IMPORTANT STEP - AFTER STARTING THE ENGINE (DO NOT DRIVE!!!) YOU
MUST PUMP THE BRAKE PEDAL UNTIL YOU GET THE NORMAL BRAKE FEELING
14. drive the car slowly and at about 5mph test the brakes just to
be on the safe side! - if you have replaced the pads, bed the pads
in for a few miles.
FINISHED!
ok few tips- when you push the caliper pistons back in- if you have
a leak of brake fluid then someone has topped up the brake fluid
after seeing it was "low" you never need to do this unless you are
changing your brake fluid because the brake system is a closed
system - the fluid just moves from the reservoir to the pistons as
the pads wear. wash off any excess fluid that got spilt with plenty
of water as it can damage your paint
RS200z edition 6MT (sxe10) dyno on 90octane gas
 |
